By the end of this guide you should have your very own self hosted instance of Fireshare running behind your own unique domain name with encrypted traffic over SSL provided by LetsEncrypt with the ability to send video clips to it from any machine on your local network.
While this guide will be done using Ubuntu, the same basic steps can be adopted to most Linux systems.
Requirements...
- Ubuntu / Linux system. This guide will be using Ubuntu. You may need to modify the commands to fit whatever Linux system you are working with.
- Basic understanding of using the command line
- Basic understanding of Docker / Docker Compose
What we will do
- Install Docker & Docker Compose
- Configure our directory structure
- Install our apps
- Fireshare
- NGINX Proxy Manager - Purchase and Setup a domain name
- Forward ports in our router
- Create a shared network folder for our video clips
- Configure NGINX Proxy Manager
Don't know what Fireshare is but found this guide? Check it out: https://github.com/ShaneIsrael/fireshare
Installing Docker
First off, lets update our packages.
sudo apt update -y && sudo apt upgrade -y
Install docker and docker compose
sudo apt -y install docker.io docker-compose
We need to add our current user to the docker group.
sudo usermod -aG docker $USER
For these changes to take effect, we need to reboot our machine.
sudo reboot
Check that docker group was added correctly with this command. You should see "docker" higlighted in the list.
groups | grep docker
Directory Setup
Fireshare requires that their be a couple directories in place that it will use to store its own data as well as read in your videos. To make this as painless as possible we will create the directory where Fireshare expects them to be, however you can put these directories anywhere you want but you will need to update the docker-compose.yml files volume map paths in a later step.
Lets create our Fireshare directories
mkdir ~/fireshare && mkdir ~/fireshare/data && mkdir ~/fireshare/processed && mkdir ~/fireshare/videos
We created a root fireshare directory in your home directory. Inside this root directory we created 3 directories that Fireshare will be using. data, processed, and videos.
The videos directory is where your videos or game clips will go. Lets turn this into a network share that you can access from any machine on your local network.
sudo apt install -y samba
Now edit our samba conf file
sudo vi /etc/samba/smb.conf
and add this to the end of the file.
[fireshare_videos]
path = ~/fireshare/videos
writeable = yes
browseable = yes
public = yes
create mask = 0644
directory mask = 0755
force user = defaultuser
Restart our Samba service
/etc/init.d/smbd restart
Now we can add our Samba share to our Windows machine. All we need is the local IP Address of our Ubuntu server.
sudo apt install net-tools
To get your local ip address type
ifconfig
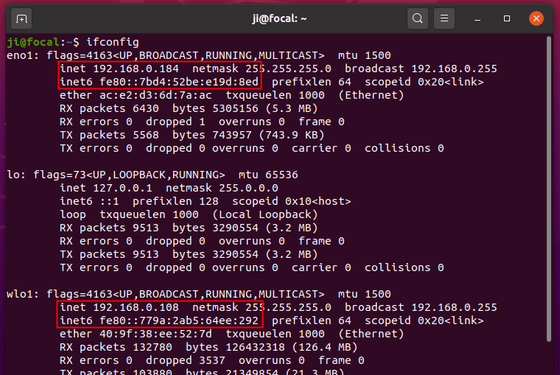
You want the address that begins with 192.168...
Now in Windows open a new folder window, navigate to "This PC" found in the left-hand navigation. On this page, you can right-click and select "Add a network location"
A window should open and when it asks for the Internet or network address, type in the local ip address for your ubuntu machine in this format. As an example, if your address was 192.168.0.184 you would type... (including the back slashes).
//192.168.0.184/fireshare_videos
Done! You should now have a folder that you can access within your Windows that you can save video clips to and they will be automatically transferred to the ~/fireshare/videos folder on your Ubunto machine.
Setting up Fireshare & NPM
Fireshare and Nginx Proxy Manager
To make this a little easier, I have provided a docker compose service file. This file is where you will make any configuration changes to either Fireshare or Nginx Proxy Manager. For this guide, the default settings should suffice.
Lets clone this file down somewhere.
sudo apt install -y git
git clone https://github.com/ShaneIsrael/fireshare-templates.git
Navigate to the cloned down directory
cd fireshare-templates
Now lets start both our Fireshare service and Nginx Proxy Manager service. Nginx Proxy Manager is what we will use to route traffic from our subdomain to our Fireshare service.
docker-compose up -d
Now to check and make sure both of our apps have stood up correctly we can use this command.
docker-compose ps
If everything is good you should see something similar to this. Note that both fireshare and nginx-proxy-manager should have their State set to Up.
       Name                 Command         State                                                    Ports

------------------------------------------------------------------------------------------------------------------------------------------------------------

fireshare             bash /entrypoint.sh   Up      0.0.0.0:8080->80/tcp,:::8080->80/tcp

nginx-proxy-manager   /init                 Up      0.0.0.0:443->443/tcp,:::443->443/tcp, 0.0.0.0:80->80/tcp,:::80->80/tcp, 0.0.0.0:81->81/tcp,:::81->81/tcp
Additionally we should now be able to access both Fireshare and NPM (Nginx Proxy Managers) web interfaces by navigating to http://localhost:8080/#/login for Fireshare and http://localhost:81/login for NPM.
Do not log into these just yet. We will come back to them later and set them up.
Creating a Subdomain
For this part you will need to purchase a domain name. Purchasing a domain name is relatively inexpensive. Depending on the TLD (.com, .org, .xyz, etc) that you go with the prices can be as low as a couple dollars.
Register a domain with any provider. The domain that I am using for this guide was registered with Namecheap. However, most of my domains I register with Google Domains.
Once you have a domain registered we need to grab your public IP address. You can do this in a couple of ways. For now, just run this command...
sudo apt install -y curl && curl https://ipinfo.io/ip
Write down the IP address that is returned from that command.
Now under the DNS settings for the domain you just registered we need to create a couple records.
A Record
host    = main
ip/data = <the ip address you wrote down>

CNAME Record
host    = fireshare
ip/data = main.<your_domain_name>

Now all three of these records will point to your public ip address. The reason for doing the A Record set as main.<hostname> is so that we can easily create many subdomains that also point to your public address.
We'll have NPM route fireshare.<hostname> to your fireshare docker container.
It may take anywhere from a couple minutes to a couple hours for these DNS changes to propogate.
An easy way to check and see if your dns settings are live is to run a ping command.
ping main.<your_domain_name>
and you should see something like this
PING main.fireshare.net (206.127.**.**) 56(84) bytes of data.
64 bytes from ***** (206.127.**.**): icmp_seq=1 ttl=63 time=1.08 ms
64 bytes from ***** (206.127.**.**): icmp_seq=2 ttl=63 time=1.14 ms
64 bytes from ***** (206.127.**.**): icmp_seq=3 ttl=63 time=1.01 ms
If you see that, then you know your settings are live.
Forwarding Ports on your Router
Depending on what router you have this part of the guide can either be really easy or really annoying. Unfortunately you may have to do some googling on your own to figure out how to forward ports on your router if you get stuck in this section.
Firs things first, we need to get to our routers Admin page. To do that, we need to know what the ip address of our router is (default gateway). On most Linux machines you can run this command...
ip route
You want the address shown on the first line after default via ... likely in the form of 192.168...
Open a browser and paste this ip address in and press enter. You should now be on your routers admin page. At this point you will need to google your routers make and model to figure out what the default login info is. Often times its something like "admin/admin".
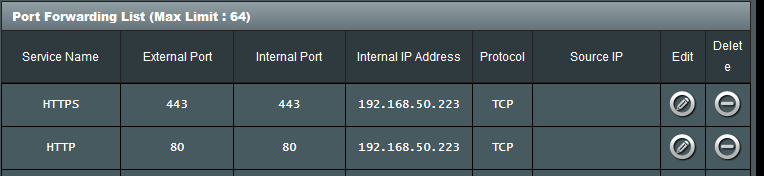
Once logged in, you want to find the virtual server / port forwarding section.
Here you want to forward ports 443 and 80 to your Ubuntu machines internal ip address. You can find the internal ip address with this command.
hostname -I
It should be the first address in the list, likely in the format 192.168...
Now that this is done, all http and https traffic on your domain will be routed to your Ubuntu machine.
We have NPM intercepting all traffic on ports 80 and 443 so all that is left is to configure NPM to route that traffic to Fireshare.
Configuring Nginx Proxy Manager
We're in the endgame now.
On your Ubuntu machine, open a browser and navigate to http://localhost:81/login
Login with the default login credentials (I recommend that you change these)
Email:    [email protected]
Password: changeme
Under the Hosts tab select Proxy Hosts.

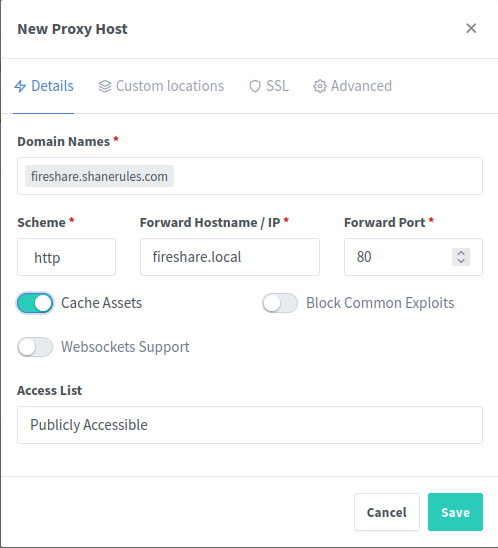
Lets add our Fireshare Proxy Host. Click the green button.
A modal will open, on the first tab Details set it up like this. Of course, change the domain name to be whatever yours is using your subdomain. Make sure you set the "Forward Port" to 80
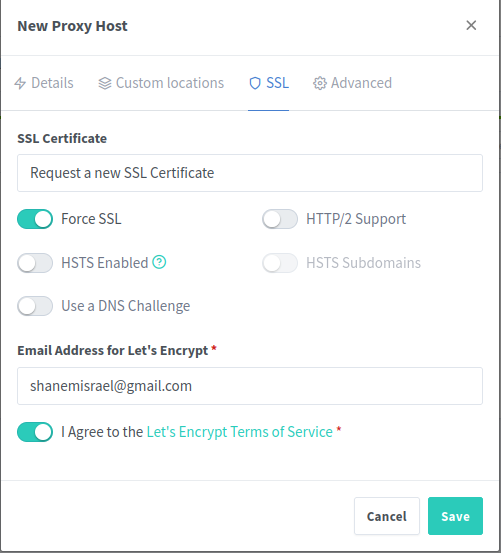
Under the SSL tab set the SSL certificate to "Request a new SSL Certificate" and enable "Force SSL". Make sure you agree to the terms. This will automatically generate a LetsEncrypt ssl certificate and force all trafic to your fireshare.domain to be encrypted.
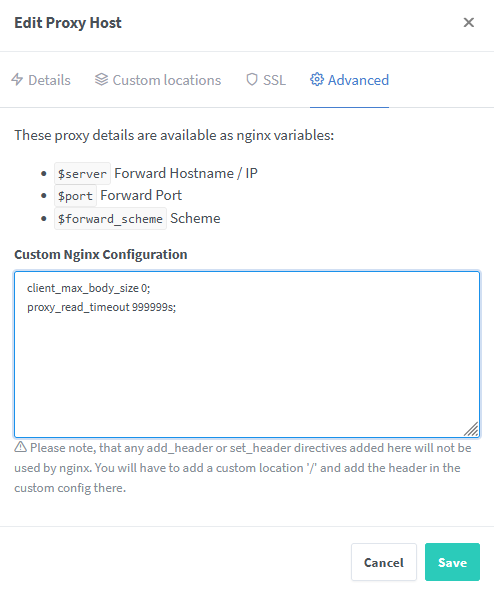
Now under the Advanced tab we need to add two parameters.
client_max_body_size 0;
proxy_read_timeout 999999s;
client_max_body_size being set to 0 will allow you to upload any size of file to Fireshare if you enable uploading from within Fireshares settings.
proxy_read_timeout 999999s guarantees that anybody uploading a file to Fireshare does not get timed out. Uploads often take a couple minutes and we don't want NPM killing the connections mid upload.
Save. It might take a couple seconds while NPM sets up your certificate. When it's done you should see a new row on the Proxy Hosts page.

Now in your browser you should be able to access Fireshare from your new domain.
Try navigating to https://fireshare.<your_domain_name>/#/login If you see this page then congratulations! If everything is working then your setup is complete!
You can login with the default credentials of admin/admin but it is reccomended you update the docker-compose.yml file and change the admin user and password.
Start adding any h.264 .mp4 / .mov / .webm files. Fireshare does not support h.265 files at the moment. By default the scanner runs every 5 minutes so it might take a minute before your videos appear.
Updating Fireshare Settings
You should probably update the default username and password.
To change Fireshares default settings. You'll need to update the docker-compose.yml that lives in the fireshare-templates folder that you cloned down in the setup section.
Simply change the values under the environment section to suit your needs. Then restart the fireshare docker container.
docker-compose restart fireshare
This command must be run from the fireshare-templates directory, because that is where the docker-compose.yml file lives. If you move this file to somewhere else, then run the command from wherever that file lives.
For more information on how to setup/user Fireshare. Please read me Github page. https://github.com/ShaneIsrael/fireshare
Comments